Today we’ll be looking at Spring-boot and a tools which developers use to migrate databases, FlywayDB. We’ll also look at how you can automate grants towards our two roles (which we created in part 3) whenever new tables are created.
- Part 1: Install/setup Oracle database (in docker)
- Part 2: Installing Java (JDK), Eclipse and Maven
- Part 3: Git, Oracle schemas and your first Java application
- Part 4: Your first JDBC Application
- Part 5: Spring-boot, JdbcTemplate & DB migration (Using FlywayDB) (This)
- Part 6: Spring-boot, JPA and Hiberate
Part 5: Spring-Boot, JdbcTemplate & DB migration (Using FlywayDB)
Spring-Boot: Where do we start?
Disclaimer
First of all, this is not a tutorial on Spring. If you are looking for such a tutorial, you can go to the Official Spring “Getting Started Guides“, or search for other tutorials on internet. This blog is a part of a blog series showing different ways Java Developers work towards an Oracle database. Today we are showing the use of Spring-boot and the JdbcTemplate.
Introduction to the Spring Framework
In a tutorial on tutorialpoint.com I found the following description of Spring:
Spring framework is an open source Java platform that provides comprehensive infrastructure support for developing robust Java applications very easily and very rapidly.
The most important feature, which maybe made Spring as popular as it has become is the Dependency Indjection (DI) and Inversion of Control (IOC). When DI or IOC is used properly, we can develop loosely coupled applications. When creating enterprise application classes should be as independent as possible of other Java classes. This increases the possibility to reuse classes. It also give the developer a better way to unit test classes independently. The DI feature (or sometime called wiring) helps in gluing these classes together and at the same time keeping them independent. Read more about DI and IOC in this tutorial.
One of the other key things about Spring is the use of annotations. This is a way of giving information about your Java classes to the Spring Framework. Spring will then use this information to integrate the different parts of your application. We’ll see the use of annotations when we start to build the todays application.
Another strength with the Spring Framework is the different modules which assist in developing different parts of an application, and the actual application requirement. The picture below (from tutorialpoint.com) shows the different Spring modules and layers:
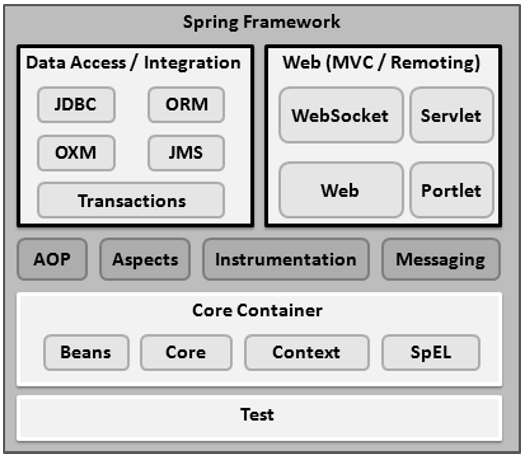 Spring modules (picture from tutorialpoint.com)
Spring-boot
One of the issues with the Spring Framework has been the amount of configuration (in XML files) and work to glue applications together – the “XML hell”. This has lead to a new framework, on top of the Spring Framework, which is called Spring-boot. The Spring-boot framework defines different application starters. Dependent of the kind of application you are going to use, you choose one or more starter package. The starter package glue together a suitable pre-choosen frameworks (and versions) which you most probably will need for the kind of application you are developing.
For instance, if you are developing a web application or an application to expose restful services, the spring-boot-starter-web would be suitable. If you add this dependency to your maven pom.xml, the following dependencies would be linked to your project:

These (picture above) APIs include the most you would need to developing a web application, including – for instance – frameworks for different Spring modules, JSON binding, validation (Hibernate validator), application server as Tomcat (Embedded Servlet Container) and logging (logback, slf4j). In addition the Spring-boot frameworks removes a lot of the need for heavy XML configuration.
The todays demo application: Spring-Jdbc
Some preparation using Spring Initializr
Today we’ll start a new application, and we’ll be using the Spring Initializr found at https://start.spring.io/. This web page you can use build a starting point for your application. Now we will use the Spring Initializr to … (Note! Click on the “Switch to the full version”).
Generate a “Maven” project with “Java” and Spring-Boot “2.1.3”:
| Group: | no.eritec.demo |
| ArtifactId: | spring-jdbc |
| Name: | spring-jdbc |
| Project: | no.eritec.demo |
| Packaging: | jar (default) |
| Java Version: | 8 (default) |
Your page should look something like this:

Then click “Generate Project”, and save the file to a know directory (for instance “Downloads”).
Open project in Eclipse
Unzip the file from the Spring Initializr in your “Workspace” directory, and open in Eclipse.
# unzip spring-jdbc.zip
# mv spring-jdbc /Users/lassejenssen/WS/.
Then go to Eclipse, and choose “File -> Open projects from File System …”:

Then open the pom.xml file, and add the Oracle driver dependency:
      <dependency>
        <groupId>com.oracle.jdbc</groupId>
        <artifactId>ojdbc8</artifactId>
        <version>12.2.0.1</version>
      </dependency>
Now we need to tell Spring the details about how to connect towards our database. Create a file name “application.properties” under the “src/main/resources” directory with the following content:
spring.datasource.driver-class-name=oracle.jdbc.OracleDriver
spring.datasource.url=jdbc:oracle:thin:@//localhost:1521/orcl
spring.datasource.username=demo
spring.datasource.password=demo
spring.datasource.initialize=false
Database: Emp table
In the todays application we’ll be using the famous “Emp” table (from the good old “Scott/tiger” schema) with some adjustments.
The table is created by the following SQL:
create sequence emp_seq start with 1 increment by 1;

create table emp(
  empno    number(4,0) default emp_seq.nextval,
  ename    varchar2(10),
  job      varchar2(9),
  mgr      number(4,0),
  hiredate date,
  sal      number(10,2),
  comm     number(7,2),
  deptno   number(2,0),
  constraint pk_emp primary key (empno)
);
Do not run this against the database yet. We’ll use FlywayDB to do this in a moment.
Domain model: Employee.java
Now we are ready to create an entity class for the employee:
package no.eritec.demo.springjdbc.domain;

import java.sql.Date;

public class Employee {

	private int empno;
	private String ename;
	private String job;
	private int managerNo;
	private Date hiredate;
	private int salary;
	private int comm;
	private int deptno;

	public Employee() {
		super();
	}

	public Employee(
			int empno,
			String ename,
			String job,
			int managerNo,
			int salary,
			int comm,
			int deptno) {
		this.empno = empno;
		this.ename = ename;
		this.job = job;
		this.managerNo = managerNo;
		this.salary = salary;
		this.comm = comm;
		this.deptno = deptno;
	}

	public Date getHiredate() {
		return hiredate;
	}

	public void setHiredate(Date hiredate) {
		this.hiredate = hiredate;
	}

	public int getEmpno() {
		return empno;
	}

	public void setEmpno(int empno) {
		this.empno = empno;
	}

	public String getEname() {
		return ename;
	}

	public void setEname(String ename) {
		this.ename = ename;
	}

	public String getJob() {
		return job;
	}

	public void setJob(String job) {
		this.job = job;
	}

	public int getManagerNo() {
		return managerNo;
	}

	public void setManagerNo(int managerNo) {
		this.managerNo = managerNo;
	}

	public int getSalary() {
		return salary;
	}

	public void setSalary(int salary) {
		this.salary = salary;
	}

	public int getComm() {
		return comm;
	}

	public void setComm(int comm) {
		this.comm = comm;
	}

	public int getDeptno() {
		return deptno;
	}

	public void setDeptno(int deptno) {
		this.deptno = deptno;
	}

}
Repository: EmployeeRepository.java
Then we’ll add a repository class, with methods to find all employees (findAll), to find an employee by id (findEmployeeById) and to create a new employee (create):
package no.eritec.demo.springjdbc.repository;

import java.sql.PreparedStatement;
import java.sql.ResultSet;
import java.sql.SQLException;
import java.util.List;

import org.springframework.beans.factory.annotation.Autowired;
import org.springframework.jdbc.core.JdbcTemplate;
import org.springframework.jdbc.core.RowMapper;
import org.springframework.jdbc.support.GeneratedKeyHolder;
import org.springframework.jdbc.support.KeyHolder;
import org.springframework.stereotype.Repository;
import org.springframework.transaction.annotation.Transactional;

import no.eritec.demo.springjdbc.domain.Employee;

@Repository
public class EmployeeRepository {
    @Autowired
    private JdbcTemplate jdbcTemplate;

    @Transactional(readOnly=true)
    public List<Employee> findAll() {
        return jdbcTemplate.query("select * from emp", new EmployeeRowMapper());
    }

    @Transactional(readOnly=true)
    public Employee findEmployeeById(int empno) {
        return jdbcTemplate.queryForObject("select * from emp where empno=?",
                                        new Object[]{empno}, new EmployeeRowMapper());
    }

    public Employee create(final Employee emp) {
    	String id_column = "empno";
    	final String sql =
        	"insert into emp(ename,job,mgr,hiredate,sal,comm,deptno) values(?,?,?,?,?,?,?)";
        KeyHolder holder = new GeneratedKeyHolder();
        jdbcTemplate.update(conn -> {
        	PreparedStatement ps = conn.prepareStatement(sql, new String[]{id_column});
                    ps.setString(1, emp.getEname());
                    ps.setString(2, emp.getJob());
                    ps.setInt(3, emp.getManagerNo());
                    ps.setDate(4, (java.sql.Date) emp.getHiredate());
                    ps.setInt(5, emp.getSalary());
                    ps.setInt(6, emp.getComm());
                    ps.setInt(7, emp.getDeptno());
                    return ps;
            }, holder
        );
        int newEmpno = holder.getKey().intValue();
        emp.setEmpno(newEmpno);
        return emp;
    }
}

class EmployeeRowMapper implements RowMapper<Employee>
{
    @Override
    public Employee mapRow(ResultSet rs, int rowNum) throws SQLException {
    	Employee e = new Employee();
        e.setEmpno(rs.getInt("empno"));
        e.setEname(rs.getString("ename"));
        e.setJob(rs.getString("job"));
        e.setHiredate(rs.getDate("hiredate"));
        e.setSalary(rs.getInt("sal"));
        e.setComm(rs.getInt("comm"));
        e.setDeptno(rs.getInt("deptno"));

        return e;
    }
}
JUnit test: SpringJdbcApplicationTests.java
At last we create a test class to test our code. Under the “src/test/java” you’ll find the “SpringJdbcApplicationTests” class. Add the following to the code:
package no.eritec.demo.springjdbc;

import static org.junit.Assert.assertEquals;
import static org.junit.Assert.assertNotNull;
import static org.junit.Assert.assertTrue;

import java.sql.Date;
import java.util.List;

import org.junit.Test;
import org.junit.runner.RunWith;
import org.springframework.beans.factory.annotation.Autowired;
import org.springframework.boot.test.context.SpringBootTest;
import org.springframework.test.context.junit4.SpringRunner;

import no.eritec.demo.springjdbc.domain.Employee;
import no.eritec.demo.springjdbc.repository.EmployeeRepository;

@RunWith(SpringRunner.class)
@SpringBootTest
public class SpringJdbcApplicationTests {

   @Autowired
   private EmployeeRepository empRepo;

   @Test
   public void findAllUsers()  {
      List<Employee> employees = empRepo.findAll();
      assertNotNull(employees);
      assertTrue(!employees.isEmpty());
   }

   @Test
   public void findUserById()  {
      Employee emp = empRepo.findEmployeeById(1000);
      assertNotNull(emp);
   }

   @Test
   public void createEmployee() {
    	Employee emp = new Employee();
    	emp.setEname("JOHNNY");
    	emp.setJob("Sales");
    	emp.setHiredate(new Date(new java.util.Date().getTime()));
    	emp.setManagerNo(1000);
    	emp.setSalary(5000);
    	Employee savedEmp = empRepo.create(emp);
    	Employee newEmp = empRepo.findEmployeeById(savedEmp.getEmpno());
        assertNotNull(newEmp);
        assertEquals(savedEmp.getEname(), newEmp.getEname());
        assertEquals(savedEmp.getSalary(), newEmp.getSalary());
   }

}
Right click inside the “SpringJdbcApplicationTests.java” file, and choose “Run As … -> JUnit Test”. You will now hopefully see the following output:
/\\ / ___'_ __ _ _(_)_ __  __ _ \ \ \ \
( ( )\___ | '_ | '_| | '_ \/ _` | \ \ \ \
 \\/  ___)| |_)| | | | | || (_| |  ) ) ) )
  '  |____| .__|_| |_|_| |_\__, | / / / /
 =========|_|==============|___/=/_/_/_/
 :: Spring Boot ::        (v2.0.5.RELEASE)

2018-10-06 23:59:56.871  INFO 57907 --- [           main] n.e.d.s.SpringJdbcApplicationTests       : Starting SpringJdbcApplicationTests on Lasses-MacBook-Pro-5.local with PID 57907 (started by lassejenssen in /Users/lassejenssen/WS/spring-jdbc)
2018-10-06 23:59:56.872  INFO 57907 --- [           main] n.e.d.s.SpringJdbcApplicationTests       : No active profile set, falling back to default profiles: default
2018-10-06 23:59:56.874  INFO 57907 --- [           main] o.s.w.c.s.GenericWebApplicationContext   : Refreshing org.springframework.web.context.support.GenericWebApplicationContext@6331250e: startup date [Sat Oct 06 23:59:56 CEST 2018]; root of context hierarchy
2018-10-06 23:59:57.157  WARN 57907 --- [           main] o.s.w.c.s.GenericWebApplicationContext   : Exception encountered during context initialization - cancelling refresh attempt: org.springframework.beans.factory.UnsatisfiedDependencyException: Error creating bean with name 'employeeRepository': Unsatisfied dependency expressed through field 'jdbcTemplate'; nested exception is org.springframework.beans.factory.BeanCreationException: Error creating bean with name 'flyway' defined in class path resource [org/springframework/boot/autoconfigure/flyway/FlywayAutoConfiguration$FlywayConfiguration.class]: Bean instantiation via factory method failed; nested exception is org.springframework.beans.BeanInstantiationException: Failed to instantiate [org.flywaydb.core.Flyway]: Factory method 'flyway' threw exception; nested exception is java.lang.IllegalStateException: Cannot find migrations location in: [classpath:db/migration] (please add migrations or check your Flyway configuration)
2018-10-06 23:59:57.159  INFO 57907 --- [           main] ConditionEvaluationReportLoggingListener :

Error starting ApplicationContext. To display the conditions report re-run your application with 'debug' enabled.
2018-10-06 23:59:57.161 ERROR 57907 --- [           main] o.s.boot.SpringApplication               : Application run failed

org.springframework.beans.factory.UnsatisfiedDependencyException: Error creating bean with name 'employeeRepository': Unsatisfied dependency expressed through field 'jdbcTemplate'; nested exception is org.springframework.beans.factory.BeanCreationException: Error creating bean with name 'flyway' defined in class path resource [org/springframework/boot/autoconfigure/flyway/FlywayAutoConfiguration$FlywayConfiguration.class]: Bean instantiation via factory method failed; nested exception is org.springframework.beans.BeanInstantiationException: Failed to instantiate [org.flywaydb.core.Flyway]: Factory method 'flyway' threw exception; nested exception is java.lang.IllegalStateException: Cannot find migrations location in: [classpath:db/migration] (please add migrations or check your Flyway configuration)
The test fails with the following error:
Cannot find migrations location in: [classpath:db/migration]
Remember we told Spring-Boot we wanted to use “FlywayDB” (when we checked the flyway box when using Spring Initalizr)? Now Flyway expects to find the “db/migration” directories under the resources location. So let’s focus on the migration tool, FlywayDB, for a while.
Database Migration using FlywayDB
![]() Developers use different tools to migrate changes in the data model into their database. In my last Java projects the developers have been using either FlywayDB or Liquibase, but there are other utilities on the market. In this blog post we’ll be using FlywayDB (also called Flyway), which is very simple and straight forward.
Developers use different tools to migrate changes in the data model into their database. In my last Java projects the developers have been using either FlywayDB or Liquibase, but there are other utilities on the market. In this blog post we’ll be using FlywayDB (also called Flyway), which is very simple and straight forward.
If you go the the Flyway download page, you’ll see that there is both an community edition, an pro edition and an enterprise edition. For instance, the community edition, which we will be using, does not have a UNDO migration feature. Further Flyway has both a command line utility, a maven (or gradle) plugin and a Java API. In this blog we’ll be using the maven plugin, and therefor you don’t need to download and install anything on your computer. Maven will do this for us. If you want to read more about how flyway works you can go to https://flywaydb.org/getstarted/how. In this blog post we will see how we can easily get flyway up and running in a maven project, and get a small feeling of what a migration utility does for the developers.
Note! This is not a tutorial in FlywayDB, but an example of how developers can use a tool like Flyway in their daily work to keep their database schemas up to date.
Ok. Let’s get going, and start to create our database changes. First we need to create the directories where Flyway expects to find the migration scripts:
# cd src/main/resources
# mkdir -p db/migration
# cd db/migration
# vi V1__init.sql
Copy the following to the V1__table_emp.sql script (note! important to use two underscores in the name):
create table emp(
  empno    number(4,0) GENERATED BY DEFAULT ON NULL AS IDENTITY START WITH 1000 INCREMENT BY 1,
  ename    varchar2(10),
  job      varchar2(9),
  mgr      number(4,0),
  hiredate date,
  sal      number(10,2),
  comm     number(7,2),
  deptno   number(2,0),
  constraint pk_emp primary key (empno)
);

insert into emp (ename, job, mgr, hiredate, sal, comm, deptno) values ('LARRY', 'CEO', null, sysdate-4000, 10000, null, 10);
insert into emp (ename, job, mgr, hiredate, sal, comm, deptno) values ('KING', 'Sales', 1000, sysdate-3000, 5000, null, 30);
commit;

grant select, insert, update, delete on emp to demo_rw;
grant select on emp to demo_ro;
Note! As an observant reader, you now might want to ask why I include the grants. Because in part 3 we created a DB_GRANT package to take care of these. The reason I do include these grants, is because I soon want to test and show you the flyway CLEAN command. This command will wipe away (drop) all objects belonging to the DEMODATA user, including the DB_GRANT package.
If we only were using one single Oracle user (to both store data and access data from the application) then Spring-boot would take care of Flyway for us. But because we do it the right way, and have both an data owner (DEMODATA) and application user (DEMO), we need a little more configuration.
Open the “application.properties” file, and add the following:
spring.flyway.user=demodata
spring.flyway.password=demo
spring.flyway.baselineOnMigrate=true
spring.flyway.table=SCHEMA_VERSION
Here we are telling Spring which user to use when migrating database with Flyway. By setting “baselineOnMigration=true” we are telling FLyway to go on with the migration if the schema in question is not empty. Flyway will then create a baseline for our migrations.
mvn flyway:clean
Sometimes it is very nice to be able to start all over from scratch. This is also true for our database schema. This way we can repeat the same test over and over again, expecting the same result every time. Flyway let us do this by using the “clean” command.
One way to do this is by using the maven command “mvn flyway:clean”. But then we need to tell Maven the same things which we told Spring (in the application.properties file).
Add the following plugin information to your build section in the pom.xml file (Note! I have included the whole build section below):
   <build>
      <plugins>
         <plugin>
            <groupId>org.springframework.boot</groupId>
            <artifactId>spring-boot-maven-plugin</artifactId>
         </plugin>
         <plugin>
            <groupId>org.flywaydb</groupId>
            <artifactId>flyway-maven-plugin</artifactId>
            <configuration>
               <url>jdbc:oracle:thin:@localhost:151/orcl</url>
               <user>demodata</user>
               <password>demo</password>
               <locations>db/migration</locations>
               <table>SCHEMA_VERSION</table>
            </configuration>
            <dependencies>
               <dependency>
                  <groupId>com.oracle.jdbc</groupId>
                  <artifactId>ojdbc8</artifactId>
                  <version>12.2.0.1</version>
               </dependency>
            </dependencies>
         </plugin>
      </plugins>
   </build>
By the way, we do not really need to set the name for the flyway versioning table. But if we don’t flyway will make a table called “flyway_schema_version” – in lowercase! This does not work very well in Oracle. So I specify the table name in UPPERCASE, and also remove the “flyway_” prefix.
Ok. Now we are ready to do some cleaning. But before we go ahead … do you remember in the last blog (part 4), we created a PERSON table in our DEMODATA schema. What happens if we run …
# mvn flyway:clean
[INFO] ---------------------< no.eritec.demo:spring-jdbc >---------------------
[INFO] Building spring-jdbc 0.0.1-SNAPSHOT
[INFO] --------------------------------[ jar ]---------------------------------
[INFO]
[INFO] --- flyway-maven-plugin:5.0.7:clean (default-cli) @ spring-jdbc ---
[INFO] Flyway Community Edition 5.0.7 by Boxfuse
[INFO] Database: jdbc:oracle:thin:@localhost:1521/orcl (Oracle 12.2)
[INFO] Successfully cleaned schema "DEMODATA" (execution time 00:00.119s)
[INFO] ------------------------------------------------------------------------
[INFO] BUILD SUCCESS
[INFO] ------------------------------------------------------------------------
[INFO] Total time: 2.362 s
[INFO] Finished at: 2018-10-07T11:04:46+02:00
[INFO] ------------------------------------------------------------------------
Let’s now go to the database and see what has happened to our DEMODATA schema:
$ sqlplus demodata/demo@orcl

SQL*Plus: Release 12.2.0.1.0 Production on Tue Jul 24 13:23:37 2018

Copyright (c) 1982, 2016, Oracle.  All rights reserved.

Last Successful login time: Tue Jul 24 2018 13:20:30 +00:00

Connected to:
Oracle Database 12c Enterprise Edition Release 12.2.0.1.0 - 64bit Production

SQL> select * from tab;

no rows selected
As you see – all the tables (including our PERSON table) were dropped! Clean is a great help in development and test, but is of course not to be ran against production. The project I have been working have only been using Flyway in test and development. Here it will effectively give you a fresh start, by wiping your configured schemas completely clean – including all objects. If you remember, when we created the DEMODATA schema in part 3, a DEMO_GRANT package was also created in the schema. This is now wiped away. But don’t worry. We’ll add this a little later. Let’s continue …
mvn flyway:baseline
Now we could also use maven to initialize or set a baseline for Flyway. We could let Spring and flyway take care of this for us, but I just wanted to show you the Maven way of doing this.
To do this we run the “mvn flyway:baseline”. This will create the flyway versioning (or Schema History) table (which we choose to call “SCHEMA_VERSION”):
$ mvn flyway:baseline
[INFO] Scanning for projects...
[INFO]
[INFO] ---------------------< no.eritec.demo:spring-jdbc >---------------------
[INFO] Building spring-jdbc 0.0.1-SNAPSHOT
[INFO] --------------------------------[ jar ]---------------------------------
[INFO]
[INFO] --- flyway-maven-plugin:5.0.7:baseline (default-cli) @ spring-jdbc ---
[INFO] Flyway Community Edition 5.0.7 by Boxfuse
[INFO] Database: jdbc:oracle:thin:@localhost:1521/orcl (Oracle 12.2)
[INFO] Creating Schema History table: "DEMODATA"."SCHEMA_VERSION"
[INFO] Successfully baselined schema with version: 1
[INFO] ------------------------------------------------------------------------
[INFO] BUILD SUCCESS
[INFO] ------------------------------------------------------------------------
[INFO] Total time: 1.810 s
[INFO] Finished at: 2018-10-07T11:17:56+02:00
[INFO] ------------------------------------------------------------------------
If we go to our database again we see maven and flyway have created the SCHEMA_VERSION table, and inserted one baseline row:
SQL> col tname for a40
SQL> set lines 200
SQL> select * from tab

TNAME					 TABTYPE  CLUSTERID
---------------------------------------- ------- ----------
SCHEMA_VERSION				 TABLE

SQL> select * from schema_version;
![]()
The baseline command we would use if we already had a data model which we wanted to keep, and build on top of. This is not the case. We are starting from fresh, so just do a “mvn flyway:clean” again. This will remove the “SCHEMA_VERSION” table for now.
mvn flyway:migrate
Just as with the “baseline” command, you can also use Maven to migrate your database (by running “mvn flyway:migrate”). We’ll use Spring to do this instead, but we’ll also test the maven command in a second. Just keep on going.
Flyway and our DB_GRANT package
Remember the DEMO_GRANT.grantToRoles procedure we need to run to grant privileges on new objects to the DEMO_RO and DEMO_RW roles (see part 3). As we talked about earlier in this post, the flyway clean operation dropped this package and package body. We therefore now need to recreate it. It also would be very nice if this procedure could be triggered automatically every time we created a new object. So let’s also add a DDL trigger. Since both the package and the trigger could be defined as “CREATE OR REPLACE”, this is a repeatable migration. Therefore we name this file “R__add_pkg_demo_grant.sql”. These files (with prefix “R__” will be ran every time we do a migrate). Because of the dependency (the trigger is dependent of the package) we put both the package and the trigger in the same migration script.
Create the following file in the “src/main/resource/db/migration” directory:
CREATE OR REPLACE PACKAGE DEMO_GRANT AS
    APP_NAME       CONSTANT  varchar2(4)    :='DEMO';
    SUPP_USR       CONSTANT  varchar2(8)    :='DEMOSUPP';
    DATA_USR       CONSTANT  varchar2(8)    :='DEMODATA';
    ROLE_NAME_RW   CONSTANT  varchar2(7)    :='DEMO_RW';
    ROLE_NAME_RO   CONSTANT  varchar2(7)    :='DEMO_RO';

    procedure grantToRoles;
END;
/

CREATE OR REPLACE PACKAGE BODY DEMO_GRANT AS
    PROCEDURE log(txt_i IN varchar2) AS
    BEGIN
       dbms_output.put_line(txt_i);
    END;

    PROCEDURE grant_to_roles(obj_name_i IN varchar2, obj_type_i IN varchar2) AS
       p_sql varchar2(200);
    BEGIN
       -- Grant to RW role
       p_sql := 'GRANT ' || case obj_type_i when 'TABLE'     then 'SELECT, INSERT, UPDATE, DELETE'
                                            when 'VIEW'      then 'SELECT'
                                            when 'SEQUENCE'  then 'SELECT'
                                                             else 'EXECUTE' end ||
                        ' ON ' || obj_name_i || ' TO ' || ROLE_NAME_RW;
       begin
          execute immediate p_sql;
          log('Grant towards ' || obj_name_i || ' to ' || ROLE_NAME_RW || ' completed successfully.');
       exception when others then
          log('ERROR: Grant towards' || obj_name_i || ' to ' || ROLE_NAME_RW || ' failed: ' || SQLERRM);
       end;

       -- Grant to RO role if table or view
       if obj_type_i in ('TABLE','VIEW') then
          p_sql := 'GRANT SELECT ON ' || obj_name_i || ' TO ' || ROLE_NAME_RO;
          begin
             execute immediate p_sql;
             log('Grant towards ' || obj_name_i || ' to ' || ROLE_NAME_RO || ' completed successfully.');
          exception when others then
             log('ERROR: Grant towards' || obj_name_i || ' to ' || ROLE_NAME_RO || ' failed: ' || SQLERRM);
          end;
       end if;
    END;

    PROCEDURE grantToRoles is
    BEGIN
       dbms_output.enable(1000000);
       FOR rec IN ( SELECT object_name,  object_type  FROM user_objects
                    WHERE object_type IN ('TABLE','PACKAGE','PROCEDURE','FUNCTION','SEQUENCE','VIEW','TYPE')
                      AND NOT (object_type like '%PACKAGE%' and object_name='DEMO_GRANT'))
       LOOP
          BEGIN
             grant_to_roles(rec.object_name, rec.object_type);
          EXCEPTION WHEN others THEN
             dbms_output.   put_line('Bad object_name='  || rec.object_name);
          END;
       END LOOP;
    END;
END;
/

CREATE OR REPLACE TRIGGER trg_after_create AFTER CREATE ON SCHEMA
DECLARE
  pragma autonomous_transaction;
  l_jobno PLS_INTEGER;
BEGIN
  dbms_job.submit( l_jobno, 'BEGIN demo_grant.granttoroles; END;',  sysdate + interval '10' second );
  commit;
END trg_after_create;
/
mvn flyway:info
Instead of applying these changes right away, let’s look at another flyway command – the “info” command:
$ mvn flyway:info
[INFO] Scanning for projects...
[INFO]
[INFO] ---------------------< no.eritec.demo:spring-jdbc >---------------------
[INFO] Building spring-jdbc 0.0.1-SNAPSHOT
[INFO] --------------------------------[ jar ]---------------------------------
[INFO]
[INFO] --- flyway-maven-plugin:5.0.7:info (default-cli) @ spring-jdbc ---
[INFO] Flyway Community Edition 5.0.7 by Boxfuse
[INFO] Database: jdbc:oracle:thin:@localhost:1521/orcl (Oracle 12.2)
[INFO] Schema version: << Empty Schema >>
[INFO]
[INFO] +------------+---------+------------------+------+--------------+---------+
| Category   | Version | Description      | Type | Installed On | State   |
+------------+---------+------------------+------+--------------+---------+
| Versioned  | 1       | table emp        | SQL  |              | Pending |
| Repeatable |         | add pkg db grant | SQL  |              | Pending |
+------------+---------+------------------+------+--------------+---------+

[INFO] ------------------------------------------------------------------------
[INFO] BUILD SUCCESS
[INFO] ------------------------------------------------------------------------
[INFO] Total time: 1.604 s
[INFO] Finished at: 2018-10-07T11:42:05+02:00
[INFO] ------------------------------------------------------------------------
The info command compare the SCHEMA_VERSION table to the available scripts. Then we could easily know the state of our database before running migration. Above we see that all scripts are “Pending”, and not applied yet. So, let’s finally do a migrate:
$ mvn flyway:migrate
[INFO] Scanning for projects...
[INFO]
[INFO] ---------------------< no.eritec.demo:spring-jdbc >---------------------
[INFO] Building spring-jdbc 0.0.1-SNAPSHOT
[INFO] --------------------------------[ jar ]---------------------------------
[INFO]
[INFO] --- flyway-maven-plugin:5.0.7:migrate (default-cli) @ spring-jdbc ---
[INFO] Flyway Community Edition 5.0.7 by Boxfuse
[INFO] Database: jdbc:oracle:thin:@localhost:1521/orcl (Oracle 12.2)
[INFO] Successfully validated 2 migrations (execution time 00:00.013s)
[INFO] Creating Schema History table: "DEMODATA"."SCHEMA_VERSION"
[INFO] Current version of schema "DEMODATA": << Empty Schema >>
[INFO] Migrating schema "DEMODATA" to version 1 - init
[INFO] Migrating schema "DEMODATA" with repeatable migration add pkg db grant
[INFO] Successfully applied 2 migrations to schema "DEMODATA" (execution time 00:00.245s)
[INFO] ------------------------------------------------------------------------
[INFO] BUILD SUCCESS
[INFO] ------------------------------------------------------------------------
[INFO] Total time: 2.174 s
[INFO] Finished at: 2018-10-07T11:43:42+02:00
[INFO] ------------------------------------------------------------------------
The migrate was successful. Let’s look at the INFO again (only copied the schema table):
+------------+---------+------------------+------+---------------------+---------+
| Category   | Version | Description      | Type | Installed On        | State   |
+------------+---------+------------------+------+---------------------+---------+
| Versioned  | 1       | table emp        | SQL  | 2018-10-07 11:43:42 | Success |
| Repeatable |         | add pkg db grant | SQL  | 2018-10-07 11:43:42 | Success |
+------------+---------+------------------+------+---------------------+---------+
Now we see that both scripts are ran “Success”-fully. It seems like everything went ok, but you can not really trust this output. This only tell you that the scripts were ran ok against the database. So to be 100% sure that the package, package body and trigger is compiled successfully in the database, you need to login to the database and check for errors.
Test of trigger
Note! The DEMODATA need EXECUTE privilege on DBMS_JOB package. If not allready granted this, run the following as SYSDBA: “grant EXECUTE on sys.DBMS_JOB to DEMODATA”. If your trigger compiled ok in the database, the DEMODATA user already have this privilege.
As we see above, the repeatable migration was run. If we now create another table in the DEMODATA schema, the application schema, DEMO, should get access to it in about 10 seconds. Let’s just try to create a dummy table manually through SqlPlus:
$ sqlplus demodata/demo@orcl

SQL*Plus: Release 12.2.0.1.0 Production on Wed Jul 25 13:14:57 2018

Copyright (c) 1982, 2016, Oracle.  All rights reserved.

Last Successful login time: Wed Jul 25 2018 13:12:00 +00:00

Connected to:
Oracle Database 12c Enterprise Edition Release 12.2.0.1.0 - 64bit Production

SQL> create table dummy(id number, some_text varchar2(10));

Table created.

SQL> insert into dummy values (1,'Some');

1 row created.

SQL> commit;

Commit complete.

SQL> conn demo/demo@orcl
Connected.
SQL> select * from dummy;

	ID SOME_TEXT
---------- ----------
	 1 Some
By the time we login as the demo user, the necessary grants towards the new table is given, and we can select towards the new DUMMY table. Ok – Just drop the DUMMY table again:
SQL> conn demodata/demo@orcl
Connected.

SQL> drop table dummy purge;

Table dropped.
There are two flyway commands which we haven’t talked about yet or shown. This is the “validate” and the “repair” functions.
mvn flyway:validate
The validate function verify if your database (schema) is in sync with your local script repository.
mvn flyway:repair
The repair function you can use if one of your migration failed. If you have rolled back (or cleaned up) after the failed attempt, and you want to move the failed migration from your SCHEMA_VERSION table, you can run a “mvn flyway:repair”.
Back to our Spring-Jdbc application
So … finally let’s get back to our Spring-Jdbc application. Now we actually should be ready to run our test again. But before you do, you should run the “mvn flyway:clean”.
Then (in Eclipse) right click inside your “SpringJdbcApplicationTests.java” class, and choose “Run as … -> JUnit Test”. (Note! There are many other ways you could trigger this. For instance – on Mac you have a shortcut SHIFT-CMD-F11. Or you could also click on the green “Play” button in the menu bar. Use the main menu “Run -> Run as ..:” etc.)
In the “Console” window you should now see the test start to run. When it completes go to the “JUnit” tab, and hopefully you’ll see all your test succeeded:

Configuring Flyway with Java Config class
The next thing I want to do, is to make Flyway automatically clean before running migrate (which is triggered when I run my test class). Now I can NOT use any configuration in the Maven file (because I’m only using maven through the “spring-boot-maven-plugin”), and there is no defined parameter to set in the “application.properties” file to do this. My only option now is to use JavaConfig, which is exactly what it sounds like: Configuring by using Java code.
To do this I introduce a new class “FlywayConfig”, which we mark as a Spring configuration class by using the @Configuration annotation. We also use the @PropertySource annotation to point to the “application.properties” file. Now we can introduce a new property “flyway-clean-on-migrate” in the “application.properties” file (which will be read by the code). The parameter is going to be used to turn the clean on or off:
flyway-clean-on-migrate=true
And finally we can write our new “FlywayConfig” class:
package no.eritec.demo.springjdbc.config;

import org.flywaydb.core.Flyway;
import org.slf4j.Logger;
import org.slf4j.LoggerFactory;
import org.springframework.beans.factory.annotation.Autowired;
import org.springframework.boot.autoconfigure.flyway.FlywayMigrationStrategy;
import org.springframework.context.annotation.Bean;
import org.springframework.context.annotation.Configuration;
import org.springframework.context.annotation.PropertySource;
import org.springframework.core.env.Environment;

@Configuration
@PropertySource(value = { "classpath:application.properties" })
public class FlywayConfig {

   @Autowired
   private Environment env;

   static Logger logger = LoggerFactory.getLogger(FlywayConfig.class);

   boolean clean = true;

   @Bean
   public FlywayMigrationStrategy cleanMigrateStrategy() {

      FlywayMigrationStrategy strategy = new FlywayMigrationStrategy() {

            @Override
            public void migrate(Flyway flyway) {

               if (Boolean.parseBoolean(env.getProperty("flyway-clean-on-migrate","true"))) {
                  logger.info("Cleaning DB with Flyway");
                  flyway.clean();
               } else {
                  logger.info("Skipping cleaning (FlywayDB)");
               }

               flyway.migrate();
            }
         };

      return strategy;
   }

   public boolean isClean() {
      return clean;
   }

   public void setClean(boolean clean) {
      this.clean = clean;
   }

}
If we now create a new DUMMY table in the DEMODATA schema and run the test again, we’ll see that the DUMMY class has been dropped when the test finishes. This is because Spring now have made Flyway run clean before doing a migration.
You will find all code generated today in my GitHub repository: https://github.com/lasjen/JavaForOracleDBAs
Post a Comment